On many occasions we will need enable or disable Microsoft Defender on Windows 11. It may be to install a program or make some modification in which the antivirus complicates our lives. Is it easy to do it? Totally, we have two methods to disable it.
We must bear in mind that disabling it and not having another antivirus puts us at risk from all the threats that we can find on the Internet. Another thing to consider is that, if we are going to install another antivirus, it is not necessary to disable Windows Defender, it is automatically deactivated.
We’re not going to explain how to enable it because it’s the same as disabling it, just enabling the final options instead of disabling them.
How to temporarily disable Microsoft Defender
The first thing we will have to do is enable Windows Settings, for this we are going to press Windows + i. Once we are in the configuration, we click on “Privacy and security” located in the left sidebar. In the “Security” section, we will click on “Windows Security”.
Now we are going to click on “Open Windows Security”. The operating system will open the security application in a new window.
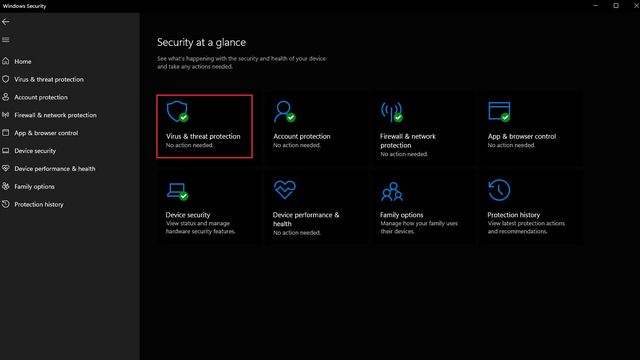
Next, we will see the security home screen. Here we will have to go to “Protection against viruses and threats”.
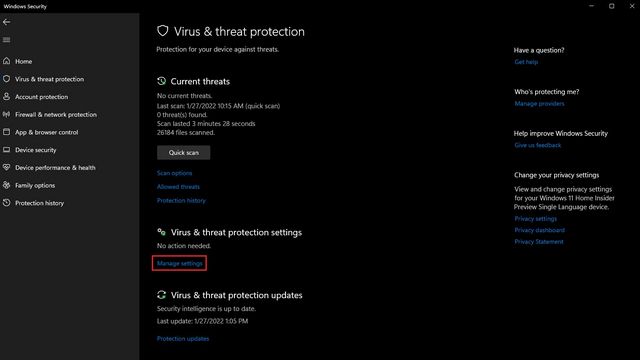
In this new section, we will have to go to “Manage settings” to be able to modify the Microsoft Defender settings in Windows 11.
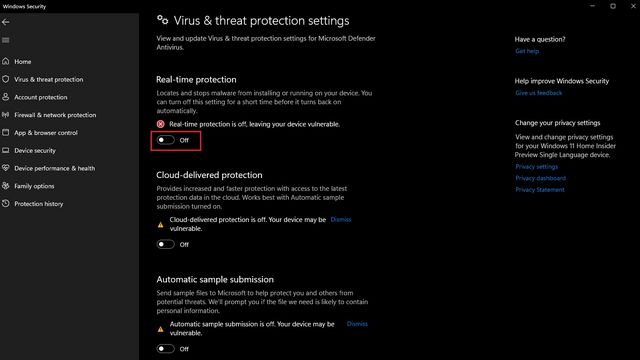
Here we can do what we came to do, we click on the “Real-time Protection” switch and the rest of the options to disable them. Windows 11 will ask us if we are sure to perform this action, we will give it “Yes” each time it is requested.
Disable Microsoft Defender permanently from Registry Editor
We can also permanently disable Windows Defender from the Registry Editor, although we must consider that it is a bit complex to do it from here and requires knowing how to use the Registry Editor, if we do something wrong, it is possible to corrupt the operating system; It is always recommended to create a backup or restore point before editing it.
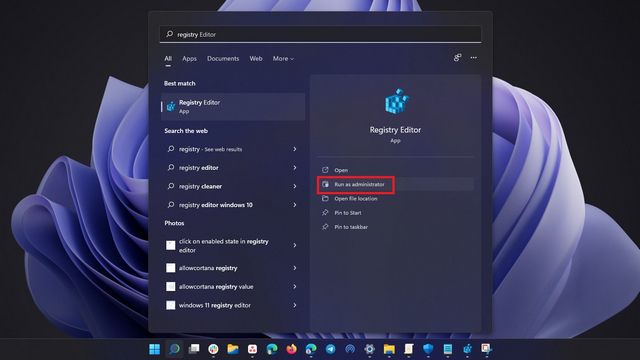
Let’s press the Windows key once and type “Registry Editor”; We are going to click on “Run as administrator” that is on the right side.
Now we’re going to have to follow this path from the left sidebar:
HKEY_LOCAL_MACHINE\SOFTWARE\Policies\Microsoft\Windows Defender
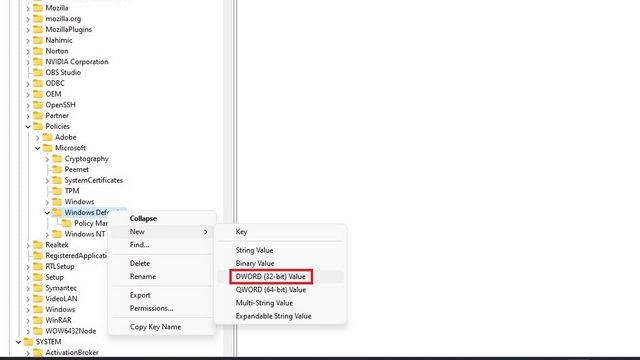
We are going to right click on “Windows Defender” and select New> DWORD Value (32 bits) and we will have to call it “DisableAntiSpyware”.
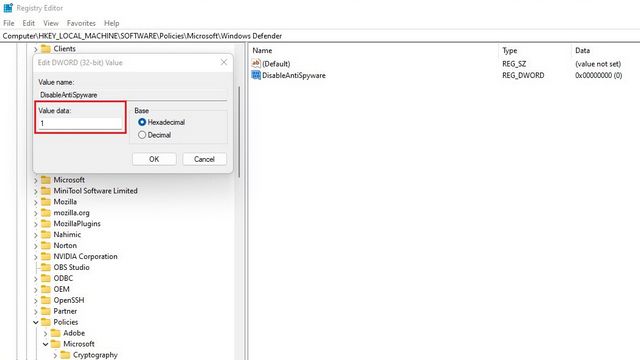
Now we will double click on “DisableAntiSpyware” and we will have to set the value to “1” and click on “OK”.
We will have to create new DWORD values for the following items, it is the same as we did above. We navigate the path through the left bar and right click on the last folder, exactly like the previous example.
[HKEY_LOCAL_MACHINE\SOFTWARE\Policies\Microsoft\Windows Defender]
“Disable AntiSpyware” dword:1
“DisableRealtimeMonitoring” dword:1
“DisableAntiVirus” dword:1
“DisableSpecialRunningModes” dword:1
“DisableRoutinelyTakingAction” dword:1
“ServiceKeepAlive” dword:0
[HKEY_LOCAL_MACHINE\SOFTWARE\Policies\Microsoft\Windows Defender\Real-Time Protection]
“DisableBehaviorMonitoring” dword:1
“DisableOnAccessProtection”dword:1
“DisableScanOnRealtimeEnable” dword:1
“DisableRealtimeMonitoring” dword:1
[HKEY_LOCAL_MACHINE\SOFTWARE\Policies\Microsoft\Windows Defender\Signature Updates]
“ForceUpdateFromMU”dword:0
[HKEY_LOCAL_MACHINE\SOFTWARE\Policies\Microsoft\Windows Defender\Spynet]
“DisableBlockAtFirstSeen” dword:1
As you can see, it is relatively simple. Obviously, disabling Windows Defender from the Registry Editor is a bit more complex and requires us to be clear about how to use it; because if we do something wrong, we can corrupt the operating system.
Share it with your friends!