The TP-Link WN821N model is one of the most used by users for home connections
Eventually, your software may not be able to provide you with the network as it should.
What are the possible solutions in these cases, and what other things do you have to consider?
WiFi adapters are small gadgets that we have at home and that allow us to connect our desktop or laptop computer to a wireless network and connect to it enjoying a high-speed connection. Generally they do not usually cause problems because it is a simple technology, but there may be some exceptions. We speak, for example, of what happens when the specific model TP-Link WN821N does not work for us.
The idea then is to discover what the possible solutions to these problems are, in order to be able to connect again. Basically, when we say that one of these devices is not working, what we mean is that it can’t detect networks, or it detects networks but doesn’t connect to the computer as it should.
Once you have definitively resolved the problem, you will be able to take advantage of the potential of this equipment again. They do not normally suffer from irreversible problems, and almost always the failures/errors are related to the software.
Why is my TP-Link WN821N not connecting and how to fix it?
The main reason or cause for this issue is outdated or corrupted network drivers. Only in exceptional situations could it be something in the hard components Of the device. Fortunately, for what it is software, the following tricks will give you a chance to solve the problem.
Run the network adapter troubleshooter
Before moving on to other troubleshooting methods, try running Microsoft’s Automated Troubleshooter for Network Adapters to get an initial diagnosis of what’s in front of you.
Press Win key + I to open Settings Below, click Troubleshoot, Other troubleshooters Click Run next to Network adapter and follow all instructions on the screen
The Solver will work for a few minutes, and at the end of its analysis it will offer you an overview of the issue.
Restart WLAN autoconfiguration services
The WLAN AutoConfig service select which wireless network a computer will automatically connect to. It includes automatic selection and connection whenever it infers that there is a preferred wireless network on your PC. Restarting this service can help you fix the current connectivity issue on your computer.
Press Win key + R to open the Run dialog Type msc and press Enter to access this menu Go down and search for WLAN AutoConfig Right click on this function, select Restart and once done, disconnect and connect the adapter
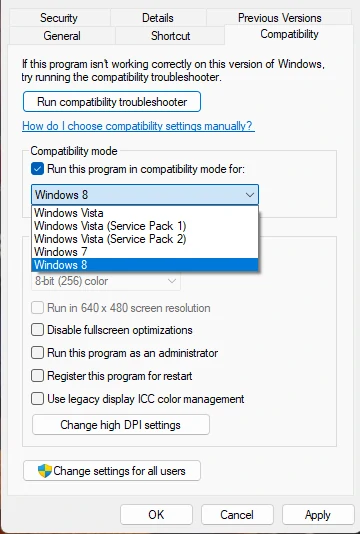
Install network drivers in compatibility mode
Installing network drivers in compatibility mode it allows us to run the programs using the configuration of a previous version of Windowsto avoid certain inconsistencies.
Download the device drivers from the manufacturer’s portal Right click on the executable file and go to Property Under Compatibility, select Run this program in compatibility mode and choose your operating system
When the procedure is done, check if the issues are fixed and if not, read on.
Run network commands
Running the network commands will reset the TCP/IP stack, renew the IP address, reset WinSock, and flush the DNS client resolver cache. Why not, processes that could be to blame for your problems.
Go to Command Prompt, choose Run as administrator, paste these commands and press Enter:
netsh winsock reset netsh int ip reset ipconfig /release ipconfig /renew ipconfig /flushdns
Once you’ve done that, reboot your device to check if the issue still occurs.
Turn the router off and on
Although you have probably already tried it, turn off and on the router to rule out that it is actually responsible for the problem. Some routers come with a dedicated button for it, and you can take advantage of it.
Other frequently asked questions
Do USB WiFi adapters need drivers?
WiFi adapters are supported by generic drivers installed in Windows by default. But if you are using an external WiFi or USB adapter, you will have to download, install and update its drivers.
Why is my TP-Link extender not showing up in the WiFi list?
As we’ve explained, this common issue is related to either the extender’s firmware being corrupted or not getting enough power, so unplug, uninstall, and reinstall.
How to reset my TP-Link to factory settings?
To reset your TP-Link to factory settings, press and hold the dedicated WPS RESET button for about 15-20 seconds, until you see the LED indicator blink rapidly. This done, he releases the button and waits for the router to reboot. He will do it with his original settings, the factory one.
Have you been able to solve your problems with the TP-Link WN821N adapter model?