

We cannot deny that BlueStacks is one of the best known Android emulators that we can use in Windows 10 to make use of all the applications of the Google operating system. However, on some occasions BlueStacks not working on Windows 10 How can we solve it?
Check if BlueStacks has errors
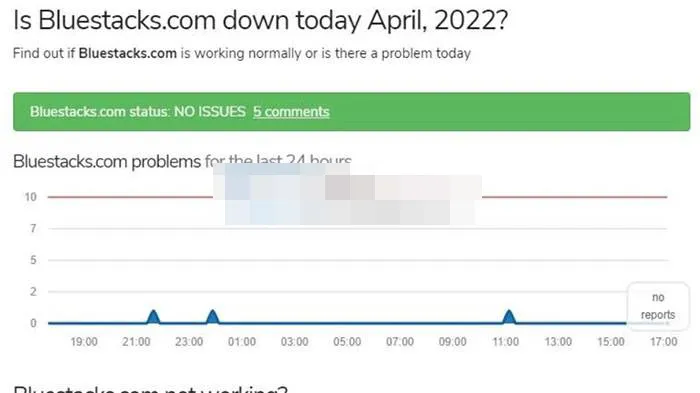
The first thing we will have to do is check if the Android emulator has errors. For this we can visit the official website of Updownradar and check the status of the application and the errors that can be reported here. However, if the app works fine, then the problem lies with your computer.
Temporarily disable antivirus
Depending on how the antivirus software is configured, BlueStacks can be interpreted as a threat to the system, which will prevent it from working properly; BlueStacks is a totally safe emulator, but sometimes antiviruses can take it as a malicious program. This is not something to worry about, we will have to temporarily disable our antivirus for the emulator to work.
Additionally, we can try disabling the Windows Firewall (temporarily) to make sure it doesn’t interfere with the application. In case the latter works, we will have to re-activate the Firewall and add BlueStacks to the list of exclusions.
Restart BlueStacks and the computer
If with the two previous solutions we have not been able to solve the problem, we will try something simpler: restart. We can start by restarting the emulator and if it still doesn’t work, restarting the computer.
Close parallel applications
All the processes that we run on the computer put pressure on the system memory. When we have too many programs open, too much memory is consumed at once; It is possible that our PC does not have enough resources for the programs to work properly.
To close parallel applications leaving space for BlueStacks, we will have to right click on the start menu or the taskbar and select “Task Manager”. A new window will open and here we are going to click on the “Process” tab, we will have to verify the percentage of memory.
The most important thing is to check memory and monitor high CPU usage; once we locate the applications that are using a large amount of resources, we will have to close them.
Enable virtualization
This is possibly the most common reason why BlueStacks is not working on Windows 10, CPU virtualization. Depending on the CPU, the way to enable it may vary. Therefore, we cannot be specific in this article. We recommend checking which CPU we have and searching the internet for a way to enable it.
Start SFC scan
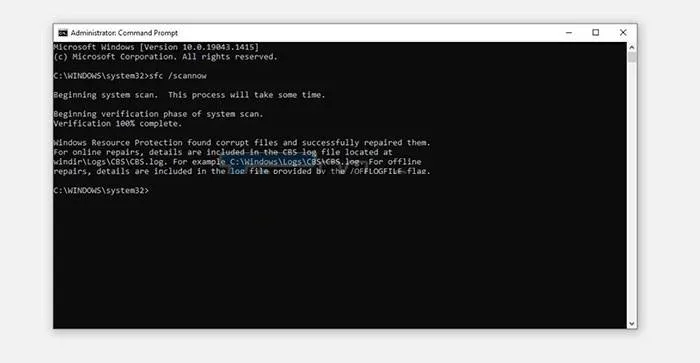

If enabling virtualization doesn’t help, we’ll run an SFC scan to make sure there aren’t any corrupted Windows files that are causing problems.
Share it with your friends!