

One of the great benefits that the browser has Mozilla Firefox is your chance to install and manage different topics to personalize it. But not only this, it also gives us the option to create our own themes from a simple plugin, we will see all this below.
How to install themes in Mozilla Firefox
Luckily, installing themes in Mozilla Firefox is something very simple that we can complete in a few steps. We have many options in terms of the designs that we can choose, we will see it a little further down:
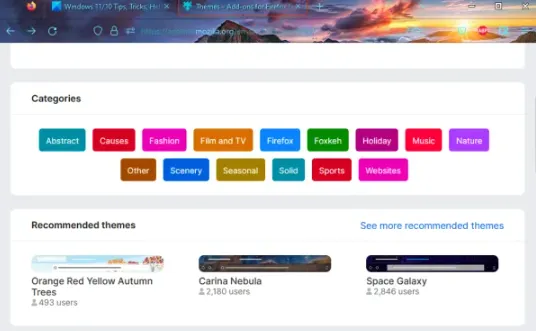
The first thing will be to access the Firefox theme store from this link. Here we are going to see a few interesting sections such as: recommended themes, trending themes and best rated themes. For each section, we will have the See more option that will allow us to access the complete list of these topics. Another option we have is to filter designs by categories. We can choose several such as: Nature, fashion, solid, landscape, film and tv, etc. When we find the theme that we really like, we will have to click on it and we will be able to access the details page, look for the Install theme button and wait for the process to finish. As soon as the theme is finished installing, it will be automatically applied to the browser. We can continue installing all the themes we want.
After installing, let’s manage themes in Firefox
Once we have all the themes that we like installed in the browser, they are saved in a section called Themes. From this section we can change between themes, enable or disable any that we have installed and much more.
We will open the Mozilla Firefox browser and click on the icon with the three horizontal lines that is located in the upper right corner of the screen to access the options menu. Now we are going to click on Plugins and Themes.
We can also access this section from quick access by pressing Ctrl + Shift + A. We will access the Firefox Add-ons Manager section.
We are going to choose Themes in the left sidebar and we will see the Manage my themes section, we will see the following options in this place:
Saved themes: here we can see all the themes that we have installed. We can see that each theme has an option called Enable, if we click it the current theme will be changed to the selected one. Enabled: it will show us the current color scheme applied to the browser. We can click on the subject to see more information such as the author’s name, latest version update, etc. We can also use the available options to configure automatic updates. We can even Deactivate the theme from here, if we click on the three dots icon we can choose Delete to get rid of that specific theme. Selection of recommended themes: we will see three different themes that will allow us to install them, it is a Firefox recommendation.
Can we create our themes in Firefox?

The most interesting of all is that there is the possibility of creating our own themes in Firefox. We cannot deny that this is great, maybe we did not find any theme that we like in the theme store, so we can proceed to create our own. For this we are going to have to install an extension or add-on that is totally free called Firefox Color.
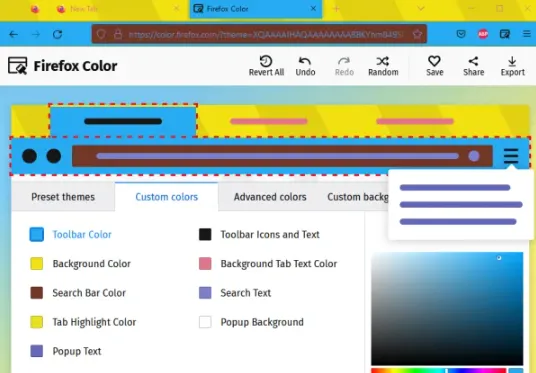
After installing the plugin, the Firefox Color page will open in a new tab. We will be able to see different preset themes, custom colors, advanced, etc. We can use the Custom Colors tab and then set the Tab Highlight Color, Search Text, Background, Icons, Toolbar Texts, Toolbar Color, Popup Text, etc. Any changes we make will be applied in real time in our browser.
We are also going to have the possibility of generating a URL to share with our friends, export it in a ZIP file or as an XPI file. Once we finish, we can close the browser and everything will be saved automatically.